Tips To Update Vintage or Worn Out Furniture
When I first got married, my Grandmother gave me this very nice, sturdy side table. I have so many wonderful memories about it, and every time I look at it I think of my Grandmother. The problem is, over all these years of wear and tear, it looks terrible. It has scratches, water stains, and the finish has dulled over time. What could I do to fix it without overextending myself?
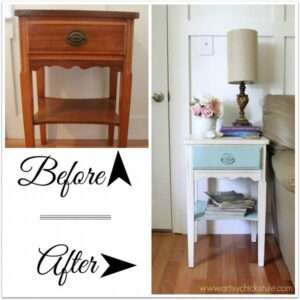
I found a simple, reliable process: “Americana Décor”. This is a paint that requires no stripping, sanding or priming, and it’s available at Home Depot in a variety of colors. Here’s the rundown of the Americana Decor® process:
1. Choose the proper work space. Here some things to consider when choosing this space:
- Temperature: Experts recommend working at “room temperature.” After painting furniture both outside and inside, I prefer working indoors. You have better control of temperature by setting the air. Also, there is a lower chance of insects or dust landing on your piece while paint is drying.
- Ventilation: If you are in a small workspace, be sure you have windows open and fans on to help move the air during the drying time (but keep the fans off while painting). Americana Decor® is non-toxic, low odor, and has low VOCs, so you don’t have to worry about strong fumes.
- Lighting: Working in natural light is ideal… but be prepared, bring extra lamps into the workspace. Most painting projects will last into the night.
- Protecting the Floor: I used a tarp, or you could use painter’s tape to tape down some brown builder’s paper onto a section of the floor, so I wouldn’t have to worry about paint drips.
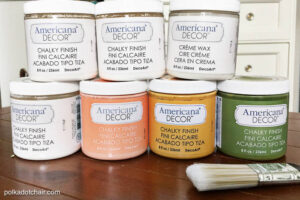
2. Prepare your supplies:
- 1 quart of Americana Décor chalk paint. An 8 ounce container will run around $11.00. I know this might seem steep, but you will not have to purchase primer. (Also, the chalk paint will go far).
- I used an angled sash brush by Latex 11/2” to 2”. Be sure to use a good quality brush as the low quality brushes may shed and stick to the piece.
- 1 tin of Americana Wax (500 ml.)
- Americana Wax Brush
- 2 clean, soft rags (microfiber, cheesecloth, or t-shirt with seams cut out will work)
- New drawer knobs (OPTIONAL – You may use the old hardware if you choose). Be sure to clean.
- Extra supplies: brown builder’s paper, painter’s tape, or a tarp, paint can opener, wooden paint stirrer, screw driver for removing hardware, rubber gloves, paper plate, plastic knife.
- Edge off any sections that won’t be painted using painter’s tape(like the inside of drawers)
3. Prep and clean your furniture piece.
- These are steps I take for any furniture makeover project I’m undertaking. So, you’ve heard some of these before!
- Remove any and all hardware, shelves, drawers and any other removable elements.
- Run your hand across the piece to find any rough patches that might need sanding (you do NOT need to sand the entire piece when using Chalk Paint® – – even if it’s varnished just any rough patches).
- Remove any sticky gunk with soap and water or one of my favorite products, Goo Gone (available at Home Depot).
- Fill any holes with wood glue.
- Clean the piece with some warm mild soapy dish water, then allow to dry completely before applying your first coat of paint.
4. Painting and distressing the piece
- Be sure to mix the paint well (if you choose, set it upside down for a while) then stir. Apply first coat of Americana Décor chalk paint then, slowly work section by section. You may prefer to begin slowly by beginning on a section that is seen less. When finished, just let dry according to directions.
- If needed, apply a second coat of Americana Décor chalk paint by repeating the process above.
- If you choose to distress piece, use sandpaper, hammer, or a chain and distress to your liking. Otherwise move to next step.
- Clean the piece, dust and wipe any debris from piece. You do want any particles to be stuck to the wax finish.
- Add one or two coats of Americana Wax (500 ml.) according to directions.
- Replace with new or the same hardware.

I hope these tips help in using Americana Décor chalk paint and encourage you to find that piece that will enhance your home with a little TLC then launch you to refinishing heights you never expected to go. I, for one, continue enjoy sprucing up my old furnishings. Next step: garage sale and flea market finds! Where will you go from there?